How to Merge Videos With Different Resolutions
By the UtilityNest team · · 6 min read

Two clips from different sources rarely match. One is a 1080p screen recording, another is a 720p clip from an older phone, and a third is a vertical video from a social app. Dropped into a plain "join" tool, they either refuse to merge or come out with the wrong picture size. This guide explains why that happens and walks through merging them so the result plays properly.
Why clips with different resolutions can't just be glued together
A video file stores compressed frames at one specific size, together with a small header that describes how to decode them. Joining files without re-encoding only works if one header can describe every clip. FFmpeg's documentation for its concat method says it plainly: "All files must have the same streams (same codecs, same time base, etc.)." A 1280 x 720 clip and a 1920 x 1080 clip fail that test straight away, so the only way to join them is to decode the frames and encode them again at one common size.
Re-encoding costs a little quality and more time than a plain join, which is why a good merge tool tells you which path it is taking. Our Merge Videos tool checks every clip for the same picture size, video format, sound settings and encoder parameters. If everything matches, it copies the data into one file without touching the quality. If anything differs, it says so and switches to re-encoding into one H.264 MP4.
Step 1: Check what your clips have in common
Add the clips and read the line under each one. In our tool it shows the file size, length, picture size and formats, for example "1280×720 · H.264 + AAC". Below the list, a note explains whether the clips can be joined as they are. The note names the reason when they can't: a different picture size, a different video format, different sound settings (or a clip with no sound at all), or different encoder settings.
In our test, two 3-second 1280 x 720 H.264 clips with identical settings were offered the fast option, "Fast, no quality loss". The page showed "same size" in the result card: the merged file was as large as the two inputs together, and it was ready in about 0.1 seconds. Two clips of the same size can still be re-encoded if they were made by different apps, because their encoder parameters differ even when the picture size matches.
Step 2: Pick one common size
When the clips differ, the tool asks for a size: Like the first clip, Like the largest clip, or a fixed 1080p or 720p. Which one is right depends on where the video is going.
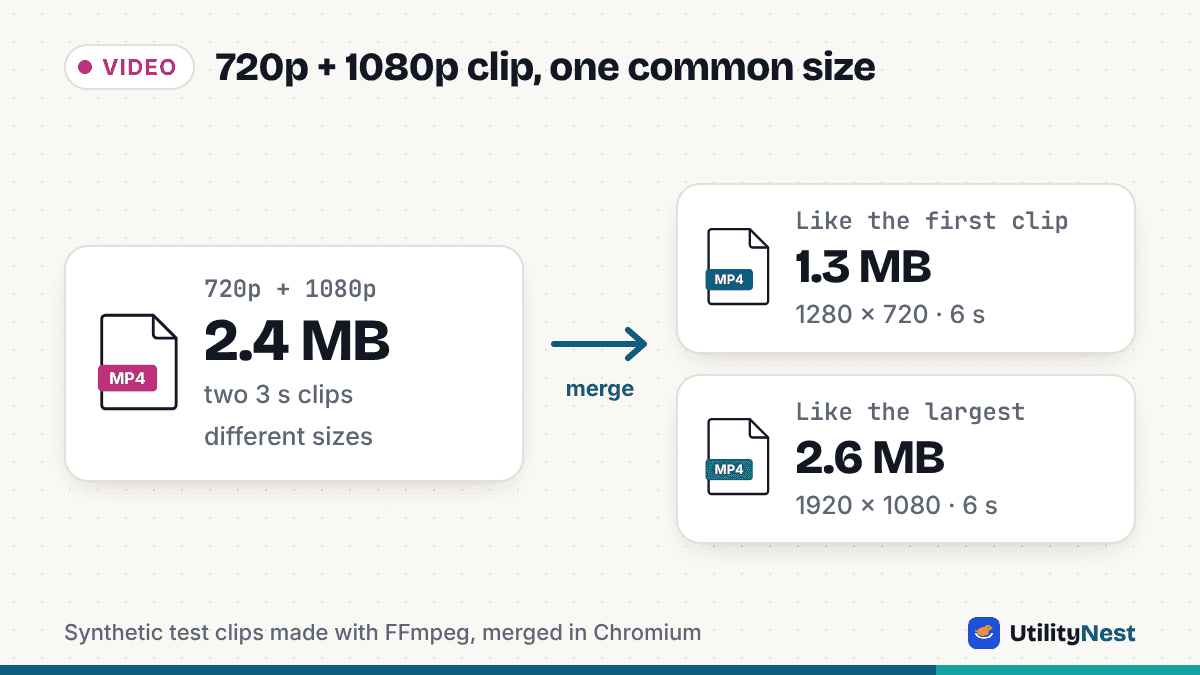
We merged a 1280 x 720 clip with a 1920 x 1080 clip, 3 seconds each, both in two ways. With Like the first clip the result was 1280 x 720 and about 1.3 MB, down from 2.4 MB for the two inputs. With Like the largest clip it was 1920 x 1080 and about 2.6 MB. Both files were about 6 seconds long and had sound. Our test clips were synthetic test patterns generated with FFmpeg, so treat the sizes as an illustration of the direction, not a prediction for your footage, since real file sizes depend heavily on what is in the picture.
Our advice: choose the size of the clip you care about most, and avoid stretching small clips unless you have to. Scaling a 720p clip up to 1080p makes the file bigger without adding detail, and the clip can look softer next to its sharper neighbors. If the video is only for sharing in a chat or an email, the smaller size is usually the better choice.
Step 3: Decide what happens to clips with a different shape
A size choice is easy when every clip is landscape. It gets awkward when one of them is a vertical phone video. The tool has a second setting for this, named Clips with a different shape, with two options: Black bars (nothing is cut off) and Fill the frame (the edges are cropped).
We merged a 1280 x 720 landscape clip with a 720 x 1280 portrait clip and extracted a frame from the portrait part of each result. With Black bars, the whole vertical picture sat in the middle of the landscape frame with black bands on both sides, and the output was 1280 x 720. With Fill the frame, the picture covered the whole frame, and the top and bottom of the portrait clip were cropped away. The files came out at about 0.84 MB (Black bars) and about 0.7 MB (Fill the frame), though sizes like these depend on the footage.
Pick Black bars for anything where you must see the whole picture, such as a screen recording with text near the edges or a clip with people near the border. Pick Fill the frame for scenery or for clips where the edges don't matter. If you want a vertical result instead, note that Like the first clip takes its size from the first clip in the list, so placing the portrait clip first gives a vertical output.
Step 4: Watch for a clip with no sound
Mixed sources often include one clip without audio, such as a screen recording made with the sound off. Different sound settings count as a mismatch, so the tool re-encodes rather than copies. We tested a 3-second clip with sound followed by a 3-second clip with no audio track. The merged MP4 was 6.0 seconds long and had one continuous audio track. With the volume measured by FFmpeg, the first half was at about -24 dB mean volume and the second half was at -91 dB, which is digital silence. So the silent clip stays silent, and the sound from the other clip is kept.
Step 5: Merge, then check the result
Press Merge. The page shows a progress bar and then the finished video in a preview, with the original and result sizes and a Download MP4 button. The 3-second test clips each took about two seconds to merge with re-encoding in Chromium. Long clips take proportionally longer, and a slower or older device will take longer still. Keep the tab open until it finishes: the page asks for confirmation if you try to close it while it is working.
Before sending the file anywhere, play it from the first second to the last. Check that the transitions between clips are where you expect, that the sound is continuous, and that black bars or cropping look the way you chose. If the order is wrong, reorder the clips with the arrows and run it again.
What the tool does and doesn't do
The output frame rate is set from the clips: the highest frame rate among them, kept between 24 and 60 frames per second, so a 60 fps clip joined with a 30 fps clip comes out at 60. The tool re-encodes to H.264 in an MP4 and sets the quality automatically, so there is no quality slider. It joins clips back to back and has no transitions, titles or trimming. If one clip needs shortening first, use Trim Video before merging, and if the merged file is too large for an upload limit, Compress Video can shrink it afterwards. Everything runs in your browser, so the clips are not uploaded anywhere.
If you only need a quick answer: matching clips are joined in a blink with no quality loss, mismatched clips need one common size, and the shape setting decides whether you lose the edges or gain black bars.
Sources
Checked on November 2, 2026. Tested with UtilityNest's Merge Videos tool in Chromium on synthetic test clips generated with FFmpeg.