How to Remove White Margins From a PDF (Even From Grey Scans)
By the UtilityNest team · · 6 min read
Most PDFs with too much white space fall into one of four cases: a document exported with wide page margins, a scan of off-white paper, a scan with a dark shadow along one edge, or a file where odd and even pages sit in different places. Each needs a slightly different fix, and one of them catches out automatic trimming. We ran all four through our own cropper and measured what came out, so the advice below matches real numbers rather than guesses.
One thing to know before you start: cropping a PDF hides the margins instead of deleting them. That is why a cropped file is no smaller, and why it can still print with white borders. The last two sections cover both.
Case 1: wide margins from Word, Google Docs or a slide export
This is the easy case. The page is white, the content is text or vector graphics, and an auto-trim tool can find the edges exactly. Our test page was A4 (210 by 297 mm) with a block of text starting 40 mm from the left and top.
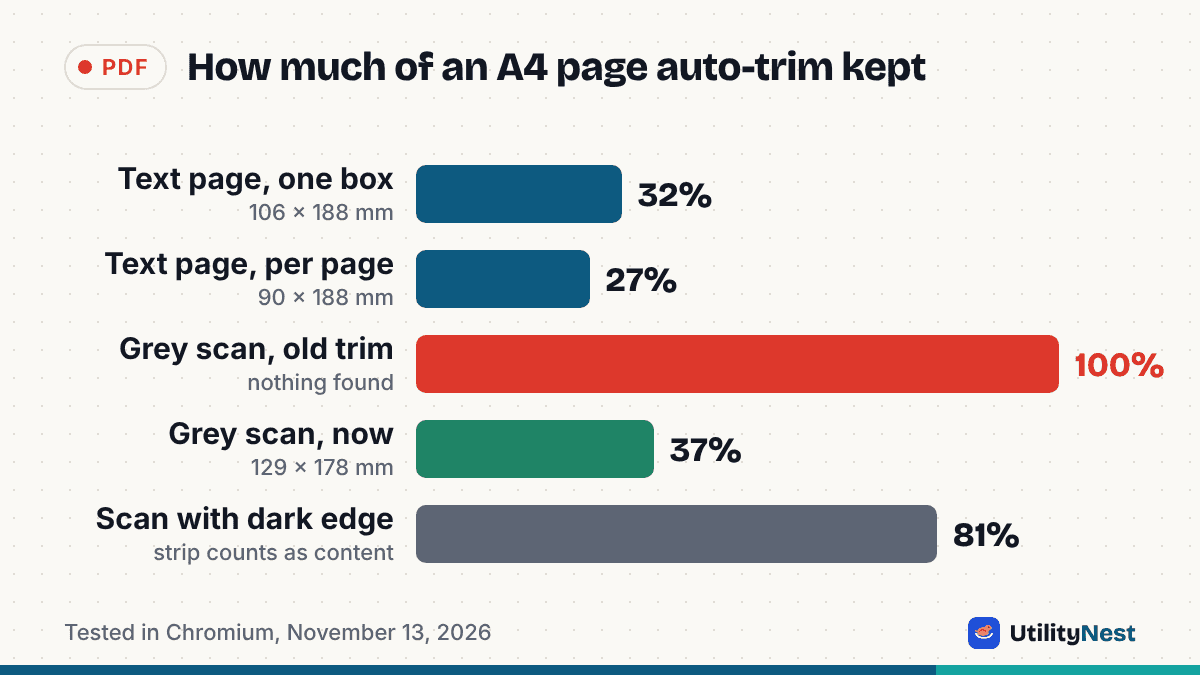
In Crop PDF, open the file, set Keep a border of to the space you want around the content (we used 0 mm to measure the content itself), and click Same box for all pages. It found margins of 37 mm at the top, 40 mm on the left, 64.4 mm on the right and 71.9 mm at the bottom, leaving a visible area of 106 by 188 mm. That is about a third of the original page, so on a phone, where the page is shown at screen width, the text comes out almost twice as large.
If you still have the original document, there is a cleaner fix: change the margins there and export again. In Word that is Layout > Margins, in Google Docs it is File > Page setup. A re-exported file has a genuinely smaller page instead of a hidden border, and nothing is left outside the visible area.
Case 2: a scan of off-white or grey paper
Scanned pages are photos, and scanned paper is almost never pure white. Recycled paper, old documents and phone scans in dim light often come out light grey. Automatic trimming usually works by looking for anything that is not white, and to a simple detector a grey page is content from edge to edge.
We saw exactly that. Our test scan had a paper colour of about 232 on a 0 to 255 scale, which looks white to the eye but is noticeably grey to a computer. Our cropper's auto-trim, as it worked until this week, returned margins of 0.3 mm on every side: it treated the whole page as content and trimmed nothing. A scan of near-white paper (about 250) trimmed correctly to 129 by 178 mm.
We changed the detector so it first measures the paper colour along the page edges and only counts things clearly darker than that paper. Run again, the grey scan trimmed to the same 129 by 178 mm as the white one. If another tool leaves a grey scan untouched, the paper colour is the likely reason, and dragging the crop box by hand is the reliable fallback.
Before scanning a batch, turn on the scanner app's "document" or "black and white" mode if it has one. It pushes the paper to pure white, which makes both auto-trim and later compression work better.
Case 3: a scan with a dark edge or shadow
Flatbed scanners and phone scans often leave a dark strip where the lid did not close or the page edge cast a shadow. To any automatic trim, that strip is real content, and it pins the crop box to the edge of the page.
Our third test page was the same grey scan with a dark strip 40 pixels wide down the left edge. Auto-trim kept the top, bottom and left margins at 0.3 mm and only removed the empty right margin, leaving 170 by 296 mm of a 210 by 297 mm page. The detector did its job: the strip is dark, so it counted. The fix is manual. Run auto-trim first so three sides are right, then drag the left edge of the box past the shadow, or type the margin in millimetres in the Margins on this page fields. Check the result at full size, because a shadow that fades out gradually is easy to cut too little of.
Case 4: odd and even pages are in different places
Books, theses and reports set up for double-sided printing have a wider inside margin, so the text block sits further right on odd pages and further left on even ones. A single crop box for every page has to cover both positions.
Our two-page test shifted page 2's text 15 mm to the right. With Same box for all pages, both pages got a 106 mm wide box, wide enough for either position, so each page kept some extra white space on one side. With Trim each page separately, page 1 came out 90 mm wide and page 2 got its own box shifted to match its text. The second option gives tighter pages; the first keeps every page the same size, which reads better when you flip through them on screen or print them as a booklet.
Why the file is no smaller after cropping
A PDF page has two boxes: the paper size (the MediaBox) and the visible area (the CropBox). Cropping, in our tool and in most PDF apps, only sets the visible area. The text, images and anything else outside it stay in the file. Our cropped test files were 37 to 71 bytes larger than the originals, because the crop box itself takes a few bytes.
That has two consequences. First, cropping is no way to cut file size; a scan needs compression for that. Second, cropping is no way to hide sensitive text. Anyone can open the file in another app, reset the crop, or copy the text out. If you are cutting away an account number or a name, use a real redaction tool instead.
Why it still prints with white margins
When a cropped page is smaller than the paper in the printer, the print dialog has to decide what to do with the gap. At "Actual size" or 100%, the smaller page is printed in the middle of the sheet and the white margins come back on paper. With "Fit" or "Fit to page" selected, it is scaled up to fill the sheet, which is usually what you want after trimming. The names vary by app, but every desktop PDF viewer has an option like it.
Some printers, print shops and older apps go a step further and ignore the crop box entirely, printing the full original page. For those, turn on Also shrink the paper size in Crop PDF before downloading. In our test, the cropped page then had a paper size of 106 by 188 mm as well as a visible area of 106 by 188 mm, so there was no larger page left for anything to fall back to. If a print shop asks for a specific paper size, such as A5, crop first and then use PDF Page Size to place the trimmed page on that sheet.
Which fix to use
| What you see | What to do |
|---|---|
| Text with wide margins, clean white page | Auto-trim with Same box for all pages, or fix the margins in the source file |
| Scan that looks white but auto-trim does nothing | The paper is grey; use a tool that measures the paper colour, or drag the box by hand |
| Auto-trim stops at one edge of a scan | A shadow or dark strip; auto-trim, then move that edge manually |
| Pages trimmed but some have extra space on one side | Odd and even pages differ; use Trim each page separately |
| Prints with white borders again | Choose Fit to page when printing, or shrink the paper size too |
Sources and test notes
- Apple Support: Crop or rotate a PDF in Preview on Mac
- Microsoft Support: Change margins in Word
- Google Docs Editors Help: Change page settings on Google Docs
Checked on November 13, 2026. Test files: an A4 two-page text PDF made with a PDF library, and 150 dpi A4 scan images with paper values of about 250 and 232, one with a 40-pixel dark strip. All crops run in Crop PDF in Chromium with a 0 mm border, November 13, 2026.